Showing posts with label Jingle. Show all posts

Thursday, February 4, 2010

Layout # 9 2010 Layout Challenge & Song Challenge


This is a layout that I just did for one of my gatherings. Lots of little "techniques" - paper pleating, made our own glitter brads, 2nd generation stamping, paper tearing, distressing. The title comes from the Taylor Swift song "Love Story" which was another challenge issued by the gal who started all of this! All products are Close To My Heart except the organza ribbon which came from Michaels and I used Fiskars "threading water" punch on the border.
I entered this layout in the Fussy and Fancy Friday Challenge - Heartshttp://fussyandfancychallenge.blogspot.com/2010/01/challenge-2-hearts.html

Monday, January 25, 2010

Layout #6 & 7 2010 Layout Challenge + Mom's Quilt


It is a blustery, wintery day here.....one of those day that makes you want to curl up in front of the fireplace with a good book! But I have too much to do before I leave on Wednesday for Nova Scotia. I finally finished the quilt top that I am giving to my Mom for her birthday on Sunday and then put the finishing touches on a couple of layouts. I even managed to get the rest of my Christmas decorations packed away......better late than never!


The first layout is the one I did "virtually" with Kim's workshop group a couple of weeks ago. Had to find the right photos for it. The layout is from CTMH Imagine - "Grand Finale" and uses CTMH Jingle level 2 paper pack. I also used American Crafts "Thickers", stickers. CTMH ink in Tulip to distress the papers, scissors to distress the edges of card stock, pop dots, and a Sakura Jelly Roll clear pen.
The second layout uses CTMH Back Country level 2 paper pack, Outdoor Denim Ribbon Rounds, chipboard title from Bizous, buttons from my sewing stash, CTMH hemp and Liquid Glass.

Wednesday, November 18, 2009

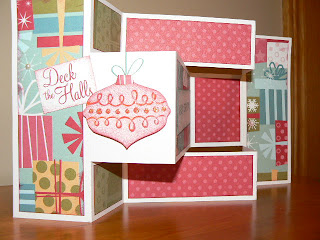
Tri-Fold Shutter Card


This past weekend I attended a crop hosted by Lora Leigh Zurstegge (http://www.loraleighzurstegge.blogspot.com/) and taught the make 'n take to attendees. We had so much fun creating this card together and many of you requested printed instructions. I have tried to make them clear, but there are lots of tutorials out there as well.


Start with a 5 1/2" x 12" piece of cardstock. Score at 2", 4". 8", and 10" mark. Turn and make 2 cuts between the 2" and 10" scores, one at 1 1/2" from the top, the other at 1 1/2" from the bottom.

You need two different double-sided patterned papers. With the first, cut the following:

2 pieces 1 3/4" x 5 1/4"
1 piece 3 1/4" x 2 1/4"
4 pieces 1 1/4" x 1 3/4" (use reverse side)

With second piece cut the following:

1 piece 1 3/4" x 2 1/4"
2 pieces 1 1/4" x 3 3/4"

Ink edges of all pieces and adhere to cardstock base leaving one spot blank for your stamped images. It should be fairly easy to determine what pieces go where based on thier sizes. Lay all pieces on the card first to make sure you are placing in the correct spot. Use scrap cardstock to stamp images and attach to card, embellish as desired. Fold card so that completed size is 5 1/2" x 4 1/4" (standard size). The centers should cross in a "Z" pattern when you look at it from above.

Have fun creating these! Try joining them to make a larger display and attach photos. The sky is the limit!

Roz

Thursday, November 12, 2009

Simple Card and Layout


I spent the day yesterday at a friends house scrapbooking......her husband cooked a fabulous lunch and supper for us, it was a fantastic day. But a request from another good friend of mine in Ontario prompted me to post some of my creations here. The layouts I created yesterday and the card is for a swap that I am participating in. Thanks for looking!