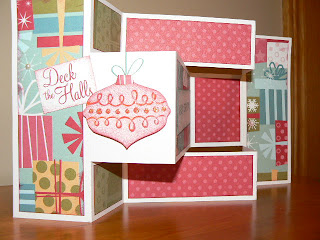
This past weekend I attended a crop hosted by Lora Leigh Zurstegge (http://www.loraleighzurstegge.blogspot.com/) and taught the make 'n take to attendees. We had so much fun creating this card together and many of you requested printed instructions. I have tried to make them clear, but there are lots of tutorials out there as well.
Start with a 5 1/2" x 12" piece of cardstock. Score at 2", 4". 8", and 10" mark. Turn and make 2 cuts between the 2" and 10" scores, one at 1 1/2" from the top, the other at 1 1/2" from the bottom.
You need two different double-sided patterned papers. With the first, cut the following:
2 pieces 1 3/4" x 5 1/4"
1 piece 3 1/4" x 2 1/4"
4 pieces 1 1/4" x 1 3/4" (use reverse side)
With second piece cut the following:
1 piece 1 3/4" x 2 1/4"
2 pieces 1 1/4" x 3 3/4"
Ink edges of all pieces and adhere to cardstock base leaving one spot blank for your stamped images. It should be fairly easy to determine what pieces go where based on thier sizes. Lay all pieces on the card first to make sure you are placing in the correct spot. Use scrap cardstock to stamp images and attach to card, embellish as desired. Fold card so that completed size is 5 1/2" x 4 1/4" (standard size). The centers should cross in a "Z" pattern when you look at it from above.
Have fun creating these! Try joining them to make a larger display and attach photos. The sky is the limit!
Roz


So happy you have a blog I can follow !!
ReplyDeleteI love this card and will make some more at home (hopefully!).
Beautiful layouts---LOVE the sunset one !
What a great card! I have yet to try a folded one but they look so neat!
ReplyDelete